Tuesday, March 31, 2015

Can I Build a Chicken Play Pen with Twisty Ties? Yes I Can!


Remember those adorable little white fluff balls that I was bragging about, my founders of the future farm flock, with their white angel wings?  Well, at six and half weeks, they have officially morphed from cute little peeping chicks to small chickens.  Stinky ones!  Not that they personally stink, but in a matter of hours they can turn nice clean wood chips into a smelly mess, and because they can fly better than any chicken I've ever had before, the daily bedding change was beginning to make us feel like we were putting on a slap stick performance routine for the cat's enjoyment.  These guys need to go outside where they can stretch their wings and spread their droppings in the fresh air.  

Brandon and I had a plan.  We were going to bring all the materials and tools home from the farm after our weekend workday, and build a coop for the eight small chickens on a Tuesday evening.  This coop would be something that we could use in the back yard of our current suburban yard, and then move to the farm when we were ready to relocate.  We had a drawing, a materials list, and a date set.  What do they say about the best laid plans?  Instead of following our plan, we left the farm in such an exhausted state that we forgot all about gathering the wood, nails, fencing, roofing, and tools.  Oh well, we though, what's one more week?   


A whole week is a lot to a chicken that's only been alive for six, and it's a lot to the person who is responsible for taking care of a big stinky chicken poop box every day!  By Wednesday afternoon the chicks and I couldn't take it anymore, and I decided to do what I do best, which is improvise.  No tools?  Who needs'em.  I got twisty ties!  


While the flock enjoyed the sun in their cage, I strapped on my brand new garden apron (thanks, Shanna!) grabbed my garden gloves, my twisty ties, my tasty beverage, and all the scrap bits of chicken wire that I use to protect my raised beds from Mrs. Hall.  I decided that what I needed was a chicken run.  It doesn't have to be night time predator proof since I can bring them inside the garage at night.  I need a play pen for chickens.  


If you want to see how the blackberries are set up, you can look at this post from last summer.  Basically, I have posts, with single strands of wire stretched between them to hold up the vines, which are in two rows.  Conveniently, the posts are arranged in a square, and there's a gap between the rows of blackberries just big enough for the lawn mower or a person to stand and pick berries.  The perfect chicken play pen shape, right?  In a hour's time I had used nearly all my twisty ties to tie together my bits of chicken wire into a rectangular shape using the posts for the corners, and then draped more chicken wire over the top of the wires to create a semi covered roof.  Then I tied a piece of tarp to the top blackberry wires, to provide a shaded rain proof area.  I used the stakes for my tomato cages to pin the chicken wire along the ground.  Ha!  Who needs tools anyway.  


Of course, as soon as I released the chicks into the run they immediately found holes along the bottom and walked out into the yard.  Since they don't like being separated from each other they didn't go far, and it was easy enough to coax them back inside with some food.  I tweaked my design a bit, and then stood back with Puck to admire our work.  It looks sort of redneck, sure, but hey, it works!  


Here you can see the run from the street view.  It's not as bad as I thought it would be, really.  The tarp is grey, so it blends in okay.  Once the trees get some leaves I don't think it will be noticeable.  The blackberry vines and weeds camouflage the sides quite well.


I added a big stick so they could learn to perch, and put their cage inside, under the tarp.  Every evening they go back in their cage to sleep in a huddle and I just carry them back inside.  It's so much better.  If they eat the weeds and grass in the blackberries and fertilize while they are at it, I'll be happy and so will the blackberries.  


And the chickens love it.  They scratch and fly and fight each other.  


I'm pretty sure I have three roosters.  Poncho is on the left, with his big red comb.  Lefty and Righty act very roosterish, but don't have such nice combs.  


When Brandon got home from teaching a late class, I took him outside to show him my new chicken run by flashlight.  I think if it hadn't been dark, he wouldn't have laughed so hard, because he would have been able to see the intricacies of my twisty tie creation.  And he wouldn't have been so focused on the numerous holes and escape routes if he had been introduced to the run during the day, when the silly chicken behavior would have distracted him.  It was really only because we had such a strong wind that the tarp was drooping so much, because I wasn't like that earlier, I'm sure.  And I agree, incorporating an intentional human entry point (a so called "door") into the design might have been easier than climbing over the wall and through a gap in the wire, but I can't think of everything.  Anyway... the chickens think it's great!

Monday, March 30, 2015

The Bloodletter and The Boner


The much anticipated springtime activities are taking over our thoughts, and all our crafty winter projects are getting tucked away to wait for the next round of snow.  But, before I get distracted by chickens and tomato plants, I wanted to let you see how the leather gun holster project turned out once it was stained, and also show off the cool leather knife sheaths Brandon made for my butchering equipment during our recent snow days.
  

Brandon used a respectable brown leather dye for his gun holster, but used a dye called ox blood for the knife sheaths. I wanted something cool stamped on the leather sheaths, too, so the giant eleven-inch blade we used for cutting chicken throats was titled the Bloodletter, and the boning knife I used for gutting was titled the Boner.  Chickens will cower in fear when they see me stroll into town with the Bloodletter and the Boner strapped to my hips, right?  


Here, you can see the leather stamp kit that Brandon uses to make letters and numbers.  He can place the letter on the end of the little metal punch, and use the hammer to pound the shape of the stamp into the leather.  This is not a peaceful craft to have happening in the dinning room, by the way.  


Brandon used a scrap piece of white leather for the Bloodletter sheath, and when he applied the first coat of ox blood leather dye, it turned the sheath a brilliant pink.  I thought it was fabulous when it was pink, and he tried to leave it that way for me, but just couldn't resist tinkering with the dye until he got it to be a deeper, less flamboyant, color.  


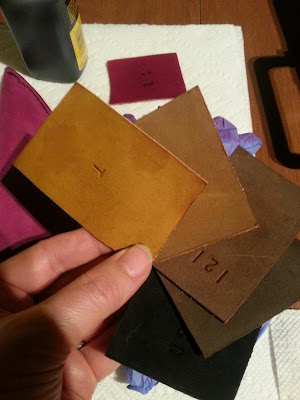
While he was busy working, I had fun investigating his gear, and was very impressed to see that he has created these swatches of leather with the different colors of dye he has used, so he can see what each color looks like when applied in a single coat to untreated leather.  This was the first time he's used ox blood, so he made a new swatch and stamped O B into the leather.  


The Boner started as a brown piece of scrap leather, and took the red dye to a nice burgundy color.  As you can see in the pictures at the top of the post, as they were drying in a basket, they ended up with matching color, and also each have a leather loop and snap which holds the knives securely in place.  

Friday, March 27, 2015

Chicken Ears Are Not Mushrooms


Have you ever tried to find a chicken ear?  When I asked Jamie this questions, he said "what is that, some sort of mushroom?"  Ha!  No, that's not what I'm talking about.    

I mean, have you ever really tried to look inside a chicken's ear?  Probably not.  Probably, most of us have never even considered chicken ears.  I've heard some good jokes about chicken lips, and after my recent adventures butchering chickens I'm pretty familiar with the rest of a chicken's anatomy, but I have to admit, chicken ears were new territory for me.  

I only became aware of the difficulty in locating a chicken's ears because one day, as I was sitting on the step to the outbuilding, watching Helen and Mrs. Hall eat their breakfast, like I do, I noticed that Helen was staggering a little.  She seemed sort of dizzy to me, which goes to show how much time I've spent watching chickens eat, I guess.  I looked on the interweb for reasons an otherwise healthy chicken would be staggering like a drunk, and found the suggestion that there could be a foreign object in her ear.  The recommendation was to look in her ears and see if there was a stick or some dirt.  Okay.  Sure.  

I picked Helen up to check in her ears and then was embarrassed to realize that I had no idea where her ears were.  I probed around on her head looking in all the weird flaps of chicken skin and under feathers and couldn't find anything that looked like an ear.  She was losing patience with my fumbling and wouldn't hold still for the examination.  Defeated, I watched a YouTube video on how to do it.  See that patch of feathers on June face, in the picture above, just below and to the left of her eye?  There's a ear in there, under a flap of feathers, and unless I'm imagining things, chickens can control those feathers so that under the threat of an ear exam, they can batten down the hatches.  


I did eventually get to investigate Helen's ears, but it was not the smooth operation that I saw on YouTube. Helen did not just stand there and let me look under her ear flap. In the video I watched, which can be viewed here, the chicken whisperer just casually peels aside the feathers on the unrestrained chicken to reveal the ear hole.  I've been envious of these chicken wrangling skills.  

Recently, I was sitting on the edge of the back porch when June perched beside me to preen her feathers.  She was calm, and didn't mind when I stroked her back and wings.  Maybe this is my chance to peak inside a chicken ear like a professional chicken handler.  Nice chicken...


Pretty chicken... see, I'm just gently petting your neck feathers... easy...


Good girl!  It's no big deal, June, I'm just going to use my finger to pet your ear feathers, so hold still...


EEEeuUUrrrp!?! (which means Back off, Food Lady! No touchy!  in chicken language).  


June seemed very insulted by my invasion of her ear flaps and kept turning her head so fast I'm pretty sure she got her eye poked by my finger.  I gave up, and apologized.  


After June went off to complain to Mrs. Hall about my rude behavior, Pork Fat became the next target of my chicken ear hunt.  She doesn't mind being handled, so I put her upside down in my lap and tried again to find a chicken ear. 


I'm pretty sure she has ears, since she responds to calls, but boy, are they hard to find under all those side burns.  And she is very wiggly, even when upside down!  I don't have the skills to reveal the ear and photograph it.  My admiration for the person in the video just keeps going up and up.  It's good to have life goals, though, so I'm not giving up.  Someday...


Mrs. Hall did not escape my attention, and while I was playing chicken doctor anyway, I used scissors to trim the feathers on her backside so that we can, hopefully, avoid the disgusting fly strike scenario that we endured twice last summer.  Butt feather trimming is something that I've been threatening, but hadn't mustered the courage to try until now.  It really wasn't as bad as I thought it would be.  I just clamped her upside down between my knees and quickly clipped away any feathers that looked in danger of getting dirty.  I took a picture of us in the act, but then quickly deleted it when I reviewed my photos.   There are some things that even I think should not be shared with the world!  I thought Mrs. Hall would hold it against me, but once I put her right side up, she went back to eating grass like nothing had ever happened.    

Thursday, March 26, 2015

The World is Alive


Even before I notice the spring peepers calling from the ponds in the horse pasture near our neighborhood, or see the buds on the daffodils, I know the winter is over because the giant silver maple tree outside my front door drops thousands of buds.  I'm not sure if the birds are causing this, as the tree is full of noisy birds, so maybe I need to pay special attention to see if I can catch them in the act.  


I asked google if it was normal for a maple to lose so many buds, since it appears that these buds have not yet opened to form flowers, but the only answers I got were people complaining about the mess.  I don't mind it at all.  I'm so glad to know the trees are waking from their winter slumber, that I welcome the excuse to sweep the porch in the spring air.    


Even though it's been raining and cloudy, and the lawn is squishy with the recent rain, Puck and I are excited to tour the yard taking photos of flowers and rocks instead of snow and ice


I've been taking careful notice of all the places water stands after the rain.  As lovely as the water is, I am aware that mosquito season is upon us.  Jamie and I saw small blue butterflies this week while working in the field, and last night, when I went outside wearing my headlamp to check on the chickens, a moth fluttered around my face.  I found a cricket in the shower this morning, and a tiny spider slowly descended on a long web right in front of my face while I was brushing my hair.  The bugs are back.  The flowers are back.  The trees are budding.  It feels like the whole world is alive!  


Speaking of life... I opened a capped bottle of my home brew kombucha that I allowed to sit out on my counter for over a month, and it sprayed all over my kitchen!  It was extra fizzy- extra alive.  Now I know that more than a month is too long for a secondary ferment without going in the refrigerator first to calm the activity of the organisms.  Even after cleaning up the mess, what was left of the kombucha in the bottle was extra fizzy.  And tartly delicious!

Tuesday, March 24, 2015

Spring Flowers on the Way to Tiling the Step


On Sunday morning, as Brandon and I were loading the day's gear into the the truck for a marathon work day of laying tile, I paused by our front gate to admire the crocus.  I pointed them out to Brandon, who was bustling about, but I could tell he wasn't giving them their proper attention.  Later, at a stop light on our drive to the farm house, I showed him the photo above, on my phone, and he seemed surprised by these flowers and asked where I took the photo.  Doh!  


I don't seem to have any trouble taking time to smell the proverbial rose, and daily I'm reminded of the promise of the season's flowers by the cheerful nod of the daffodils that are popping up in my flower bed and in lawns everywhere right now.  


There are no daffodils at the farm house, which is probably just as well, since I am trying to stay focused on work inside, and I'm already distracted by so many things outside.  I managed to limit myself to a single exploratory lap around the ten acres with Puck, checking that all the fruit trees that were alive last fall are still alive, knocking the tall weeds down from last years garden, and searching the lumber piles for potential garden fence posts.  See, I can focus.  Oh yeah, the tile... 

So, remember when we created the step into the bathroom by cutting away part of the kitchen floor?  Then we filled the hole we made with concrete, to make a solid step, as shown above.  Well, we finally tackled the job of finishing the tile in the bathroom, which includes the step and the little walls around the shower stall.  


First we framed in the step so the sides were nice and flat so we would have a solid base to attach the tile.  


We mixed up the mortar, and I laid as many of the tiles as I could, while Brandon measured and cut tile to finish the bottom and for the walls of the step.  


I realize that a step may not be the most exciting aspect of a home renovation, but we have been looking at or jumping over either an ugly dirt bottomed hole or a poured concrete pad for so long, it seems amazing to me that it looks so seamless and tidy now that it has tile.  What a pretty step!


This is the first time I've ever attached tile to a vertical surface, so I really hope they stick well.  I can imagine that the walls of the step will get kicked, and it will be very disappointing if I spent all that time crawling on my knees lining up tile if they just fall off.  


Did you notice poor Puck tied to the column in the house?  I insisted that he come in the house once we were finished using the nail gun.  I had to drag him in by his leash!  He's starting to give me a complex about the house since he would rather cower under the truck then come inside.  We've been working so hard on this place, and the dog doesn't even like it!  I tied him to the post and then went about my work, and before long he relaxed in a pile of wood chips and stopped whining to go back outside.  By the end of the day he would come in and out without force, which makes me feel so much better. 


Once we finished with the step and the floor, we still had two boxes of tile, so we decided to tile around the shower stall too.  This meant that each tile had to be cut to the right size, which was a lot of work.  


We were very happy with the tile job by the end of the day, and also very tired.  I'm glad it looks good, because it's hard to believe my hands will ever recover.  Even though I tried to keep my gloves on, I managed to get mortar on my hands often enough that I ended up having to just cut my fingernails extra short and steel myself to having hands so rough that it sounds like sandpaper when I rub my fingers together.  I don't want to know what's in that stuff that it can turn skin into scales, but I'm sure it's not good.  And, I still have to do the grout!

Sunday, March 22, 2015

Now We're Getting to the Fun Stuff


Exciting things are happening at the farm house these days.  The pace of our work progress has quickened now that the days are longer and we don't have to retreat home to the hot tub early due to the cold.  With these warmer days, and with Brandon's spring break, we were able to tackle a project we've been looking forward to for a long time.  Over a year ago, Brandon ordered ten glass blocks, which have been patiently waiting nestled in their boxes all this time.  This week, we finally got to put them in play.  


We got the idea of using the glass blocks when we realized how much we liked being able to see the sunlight coming through the upstairs windows from downstairs, in the dining room.  We could see this light because we didn't have any drywall installed yet in the gap between the upstairs floor and the sloped dining room and kitchen ceiling.  We though it would be nice to capitalize on this added light above the beam and posts we built to support the upstairs floor, which is in place of the termite devoured wall that used to be there.   In the picture above, Brandon is standing on a tall ladder in the dining room, placing the blocks in the gap.  Notice how all the electric wires that branch off to the many lights and outlets run along the top near the ceiling.  


This is the view of the blocks being installed from upstairs.  When upstairs, the light from the dining room window, below, shows through the glass, which is in the wall, on the floor.


We spent quite a bit of time trying various arrangements with the blocks and finally settled on using them all in a row, centered between the two posts.  The posts, by the way, are no longer just four by fours, but have been dressed up a bit with some carpentry, to be much more substantial and attractive columns.  


Here you can see one of the columns from the vantage of the living room.  The columns are ten inches by eight inches, and the entire room divider takes on a bigger presence now that the columns are built.  


Once the blocks were installed, we covered all the butt ends of boards that could be seen underneath with a broad board, and figured out how to create a shallow chase for all the electric wires above.  


In the midst of all this carpentry, I couldn't hold out any longer and just had to turn out the lights downstairs so I could see if we were going to get the effect we were hoping for.  It works!  All of a sudden our room divider beam is so fancy!  I didn't get to admire it for very long though, since Brandon seemed to think having the lights on was important for his work.  


No problem, I turned the lights on downstairs so he could keep working, and admired the glass blocks from upstairs while I had the lights off.  It's a very nice effect up there too.  


We were pleased with the glass, and the covering of the electric wires, but somehow the broad board under the glass blocks didn't seem finished.  It needed something... something like... a shelf! Eureka!  We added a ten inch shelf, which will be perfect place to display some of our sculptural objects.  


I took this photo from the stairs.  The shelf and beam remind me of a fireplace mantel.  We built a giant mantel in our dining room.  Cool.  


Not only did we make giant leaps with the columns, glass blocks, and electric wire chase, we have also nearly completed the drywall spackling, and created some beams in the kitchen ceiling that cover the transitions between the different levels.  


The beams are made with one by fours, and they look perfect to me.  I can even imagine putting hooks in them for hanging pots and pans in the kitchen.  I love it that we are now working on projects that are inspiring my imagined organization and decoration.  This is the fun stuff, for sure.  
Related Posts Plugin for WordPress, Blogger...